
For electronics hobbyists, soldering PCBs is a good skill to master. Getting the basic techniques right, is pretty easy but there is still an amount of skill involved that will take practice to get right. We recommend you practice with a simple electronics kit or assemble a simple circuit on a perfboard.
Step 1- Clean the surface of your board
The first step is to clean the surface of your board to ensure a low resistance solder joint, use a cleaning pad or a fine grade of steel wool. For boards that have tight tolerances, take care because the steel wool shaving may get caught between pads and in holes.
Step 2- Add components onto your board
Once you have cleaned the board thoroughly, the next step is to add the components onto the board. If you have a simple circuit and only a few components to solder, you can place all the components on the board and solder them all at once. However, it is more likely that you will be soldering a few components at a time before turning the board over and placing more on it.
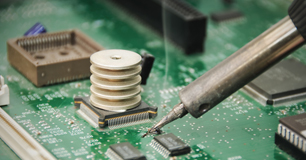
Step 3 – Start Soldering
Start by soldering the smallest and flattest components, for example the resistors, ICs, signal diodes, this makes it more stable during soldering. It is also best to save the sensitive components until the end as there isn’t a greater chance of damaging them whilst you assemble the rest of the circuit.
Apply a small amount of solder to the tip before heating the joint; this will help make contact between the board and the lead. The joint will take a couple of seconds to heat up to the temperature required to solder. However, if you have larger components and thicker pads, this will absorb more heat and therefore increase the time. If an area under the pad starts to bubble, stop heating and remove the soldering iron, this is because you are overheating the pad and increasing the danger of it lifting. If the pad over heats, let it cool down and carefully heat it again for a short time.
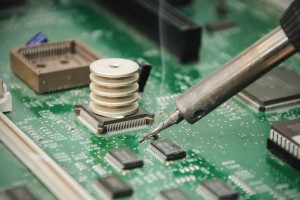
When the component lead and solder pad have heated up, the next step is to apply the solder. Touch the tip of the strand to the component lead and the solder pad, the solder should now flow freely around the lead and pad if everything is hot enough. Add the solder to the joint and completely coat the pad; this should form a small mound with slightly concaved sides. If it starts to create a ball, you have applied too much solder or the pad on the board is not hot enough.
If you’re more of a visual learner, check out our YouTube channel where we can show you how to hand solder many different components.
Philip King
Latest posts by Philip King (see all)
- 11 Inspirational Electronics TED Talks - 26th June 2015
- Team Impulse Win UK CanSat - 1st June 2015
- What is Graphene and What Will it Bring to the World of Electronics? - 19th May 2015


Leave a Reply